Step 1- Harden AWS Organizations
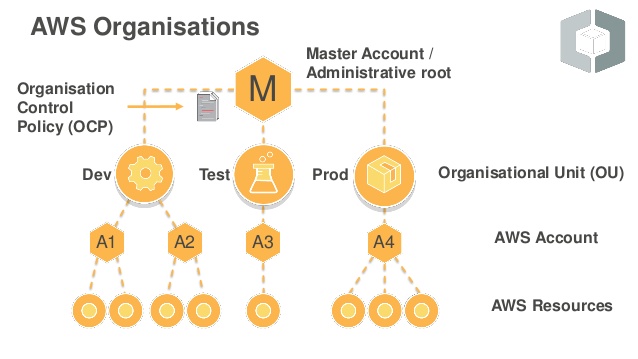
The first step towards hardening your deployment is understanding and splitting. AWS Organizations, a free AWS service, to divide accounts of your organization in Organizational Units (OU). For each OUs permissions can be adapted to be used by different people and purposes with Service Control Policies (SCP). This kind of policy acts as a frame, which the user’s permission can never surpass.
Besides this, AWS Organization offers ‘Consolidated Billing’ which aggregate the usage of all your accounts to enjoy scale discounts.
Step 2- Root User
The first-time log in is always as a root user, since no other user has been created in IAM. Hardening of the root user account is critical, because it has admin rights over the account.
Following AWS security best practices, this account must not have access keys and therefore programatic access. What does it mean?
When you create a new user you can choose how it can interact with AWS: through the console or using an access key ID and a secret access key for the API, CLI, SDK or other development tools. In order to deactivate this access keys, go to IAM and under ‘Security Credentials’ and click on ‘Make Inactive’.
This user should only be utilized to create our first user and groups and for very granular management activity. Password must be strong and rotated frequently and MFA must be active. Follow to step 3.
Step 3- Multi Factor Authentication (MFA)
Identity Access Management (IAM) is the service that AWS offers to manage users, groups, roles and policies in AWS. From here you can create users, delete them, put them into groups and attach roles (permissions) to them amongst many other features. A single password is no longer considered hardened. Therefore, AWS offers the activation of Multi Factor Authentication. To do this, navigate the user and go to ‘Security Credentials’. Once there click on Manage MFA Device. It is really easy to use with apps such us Google Authenticator and a must in to secure your setup.
Step 4-Private Subnets
No matter what kind of infrastructure you build in the cloud, it will reside within VPCs. A VPC is a logically isolated section of the AWS Cloud to launch AWS resources in a virtual network.
Inside this VPC, there will be subnets. Subnets are a part of the VPC with 2 different types: public subnets and private subnets. Regarding security, talking about private subnets is very important. The components deployed inside private subnets can only be accessed from inside the VPC. (no internet connection)
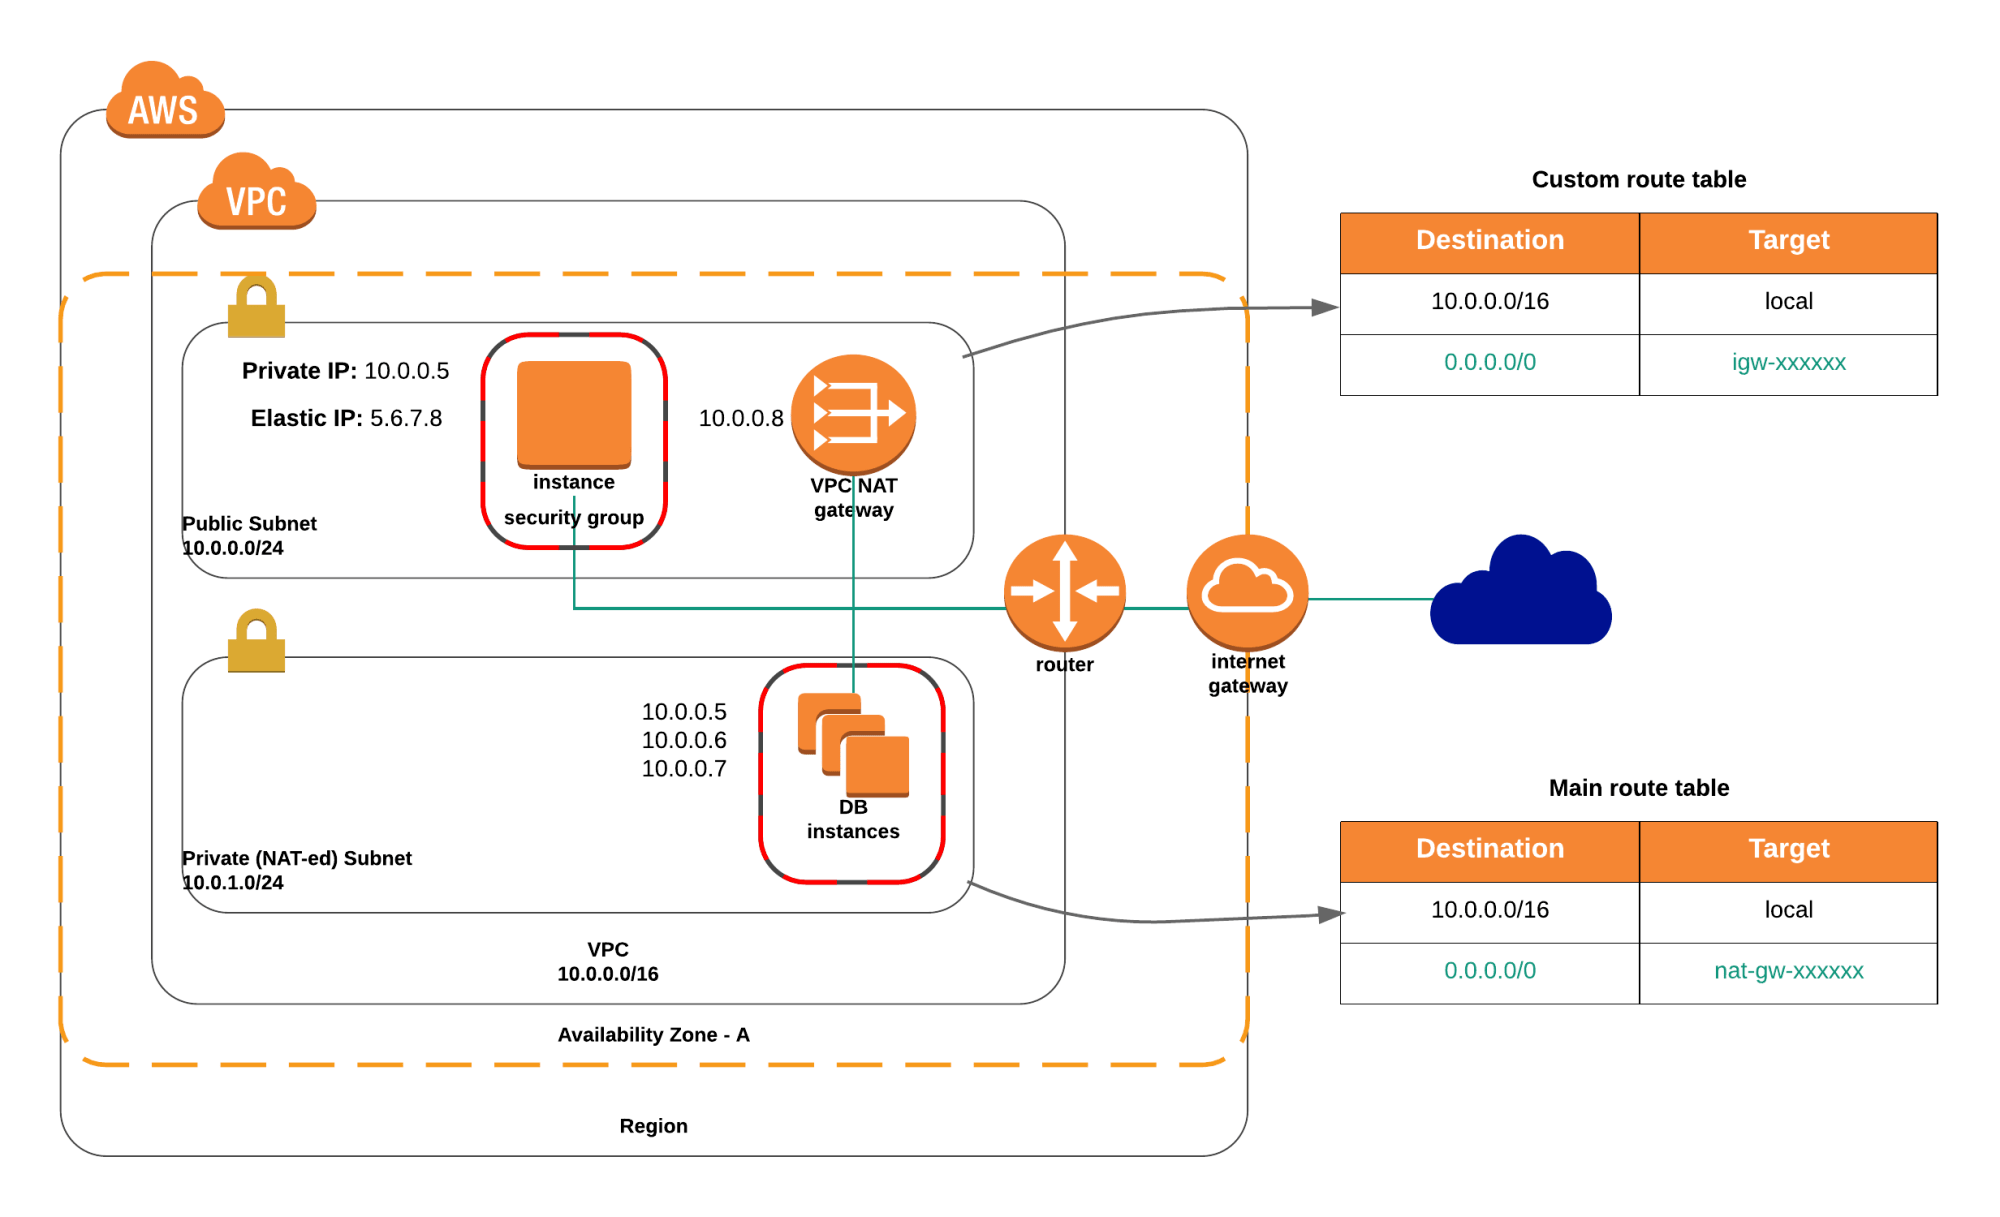
From a technical point, it means that the route table attached to it has no public route out to 0.0.0.0/0. This feature makes this kind of subnets ideal to run components such as Databases which we don’t want to be accessible from the internet.
However, if for example one of our databases needs an OS update but cannot connect to the internet…. what can we do? Let’s jump to step 3.
Step 5- NAT Gateways
A NAT Gateways is a virtual device placed in a public subnet that allows resources located in private subnets to connect to the internet going through it but does not allow incoming traffic from the internet.
In other words, if your database need an OS update it will be able to connect to the internet to download this update (traffic going from the VPC outwards) but someone connected to the internet cannot talk to our database (from the the internet into our VPC).
Deploying a NAT Gateway is free and to configurate it from a technical point, you only have to attach a route with destination 0.0.0.0/0 and target your NAT Gateway to the route table associated with your private VPC.
Step 6- Security Groups
Security groups are a basic feature in if what you are looking to harden your architecture. You can find them under EC2 and and they are attached to elastic network interface (eni). Most common applications are to secure EC2 instances and Elastic Load Balancers
They work as a classic firewall: you define rules stating what kind of traffic, protocol and range you want to accept and from which source IP or Security Group (logical referencing). An important characteristic is they are stateful, which means that if your configure certain inbound traffic to be accepted, the outbound traffic coming from it (the answer) will also be automatically accepted. Let’s say they are intelligent in their way.
Step 7- Network Access Control Lists
Network Access Control Lists (NACLS) are another free feature offered by AWS to increase the security of our infrastructure. They are very similar to Security Groups with 3 main differences:
- -Applied at subnet level.
- – ‘Deny’ rules are possible (Security Groups accept only ‘Allow’ rules)
- -They are stateless : if you allow any incoming traffic you must also then explicitly allow it on the outbound tab. If not, the resource receiving the traffic will be able to get it but the NACl will block the response.
Both in Security Groups and in NACLs, everything that is not explicitly allowed is denied.
Step 8- Harden VPC Endpoints
From a security perspective, it is important to know that whenever we access an AWS service from our VPC (S3, IAM, CloudWatch…) the request travels through the internet.
This can cause security problems as someone might be intercepting our communications using hacking techniques such as ‘Man-in-the-Middle’. For this type of scenario, VPC Endpoints come in our rescue.
A VPC Endpoint is a way of connecting from your VPC to any AWS Service without leaving the Amazon Backbone network; in other words, without going trough the internet.
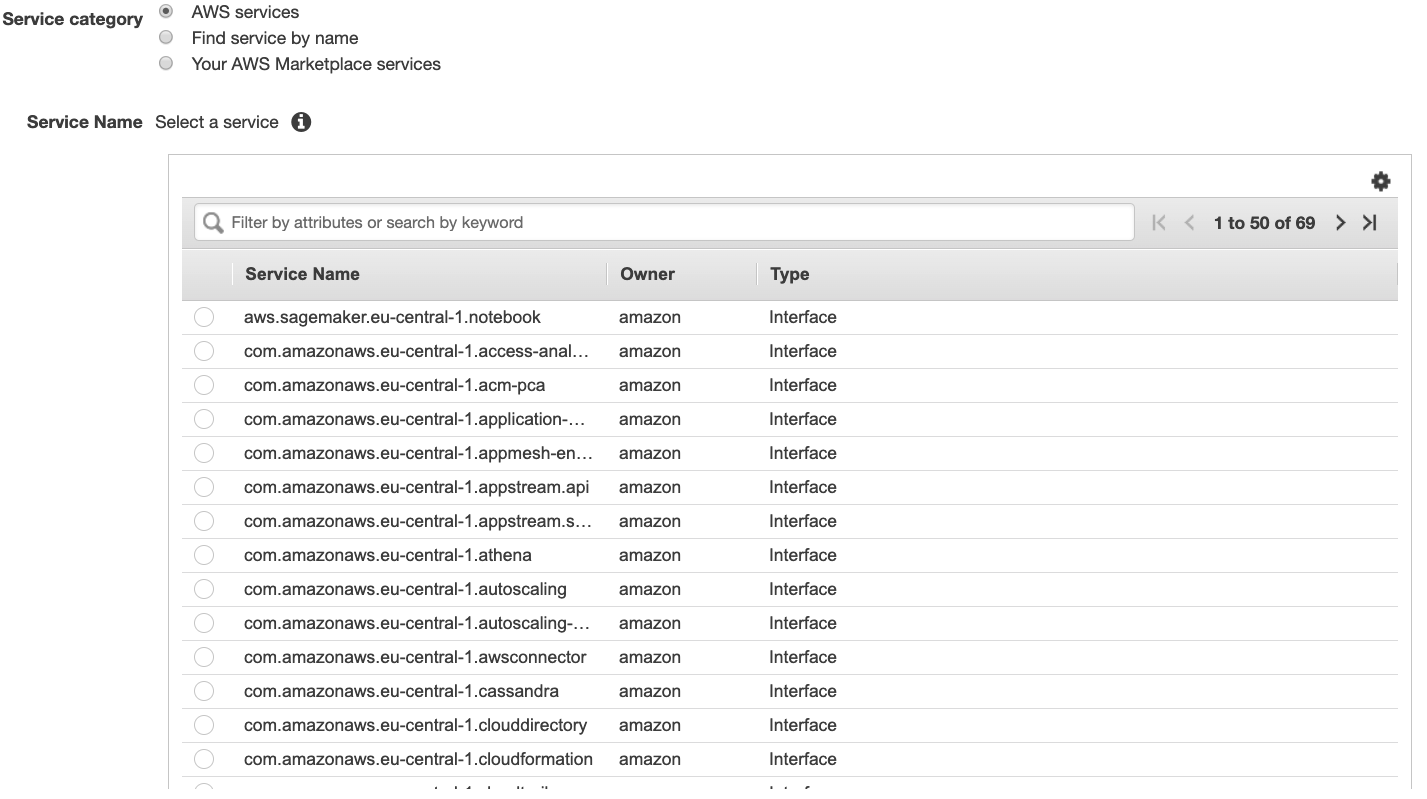
In order to create one, navigate to VPC and choose ‘Endpoint’ on the left side column. Then select the service you want to create the endpoint for and click on ‘Create’.
Once the endpoint is created, you can route the traffic to any specific service through it by simply adding a new route on the corresponding route table with the DNS name of the service as destination and the vpce-id as target.
Step 9- S3 Cross Region Replication (CRR)
As most data in AWS is stored in S3, all of the hardening and securing steps explained before would result nonsense if we loose it all.
By default, S3 (Standard) replicated all your data stored in at least 3 Availability Zones to guarantee durability. However, in case of region failure we might face a total loss of our data in the cloud which could come up with awful consequences.
Cross Region replication is a free S3 feature that allows us to automatically replicate every object uploaded to a certain bucket into another region to ensure consistency of the data.
To activate it, select the S3 bucket you wish to replicate and click on ‘Management’ –> ‘Replication’. Follow the steps to select the destination bucket in another region, permissions, encryption, ownership change if needed.
Even though this feature is free itself, you must of course pay for the storage capacity on the other region as well.
Step 10- Harden AWS Web Application Firewall
When all the steps mentioned before are not secure enough for you, then you are doing it right. To finish this list I will talk about WAF, a basic security feature place outside your VPC that will allow you to filter all kind of traffic before reaching your VPC.
AWS WAF lets you create custom rules or get predefined rules from Amazon which comply with international security standards, define IP sets and decide if you want to allow or block the traffic from them, prevent you from SQL injection, detect suspicious headers in requests and much more.
In order to do this navigate to WAF and select ‘create web ACL’. Give it a name, assign it to the resources it will front and let’s follow with the configuration.
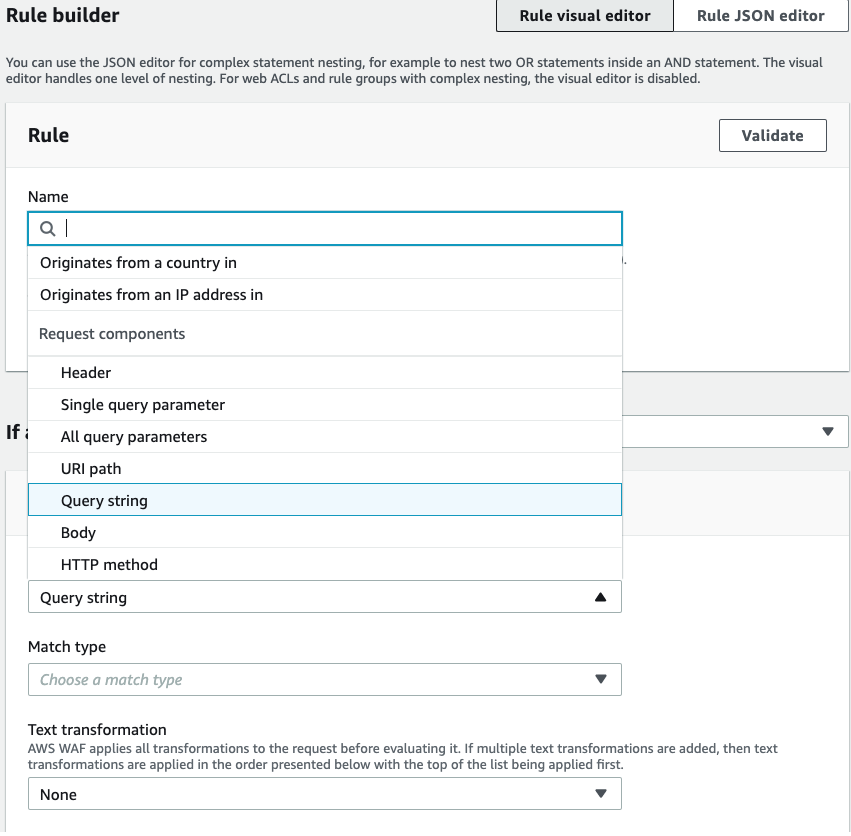
Select ‘Create our own rule’ and explore all the possible configurations.
It shouldn’t take a long time to create specific and powerful firewall rules which, with a regular firewall, would be a hard work.
Even though this service is not free, the estimated charge for small-medium size company is around 40$-50$/month with a total of around 19 rules between AWS managed and customized.
This is the end of the post, I hope you find this basic steps interesting and can rely to them one by one. Remember, there is no successful infrastructure deployment without the right security measures
Swipe Left and enjoy.